Title here
Summary here
This guide walks you through everything you need to go from “just heard about abyss” to “running your agent inside a sandbox.” By the end, you’ll have abyss installed, a working configuration file, and your agent connected to your editor.
Don’t worry if the word container or YAML sounds intimidating — we’ll explain each step as we go.
You’ll need three things before we start. None of them are complicated, and you probably already have at least two of them.
Abyss runs your agent inside a Docker container, so you need Docker installed and running on your computer.
If you’re not sure whether you have it, open a terminal and type:
docker run hello-worldIf Docker is installed and working, you’ll see a friendly “Hello from Docker!” message. If instead you see an error about the command not being found, head over to Docker’s installation guide and come back when it’s ready.
One thing to check: make sure you can run
dockercommands without typingsudofirst. Ifsudois required, you may need to add your user to thedockergroup. The Docker installation guide above explains how.
Abyss speaks the Agent Client Protocol (ACP). ACP is just the common language that your editor and your agent use to talk to each other. Any editor that supports ACP will work with abyss.
The easiest editor to get started with is Zed, and that’s what we’ll use in the examples below. If you’d rather use a different editor, the concepts are identical — only the settings screen looks different.
Abyss doesn’t include an agent of its own; it provides a safe place for your agent to run. So you need an agent to put inside it, plus whatever API keys that agent needs to talk to your LLM.
The good news: abyss ships ready-made images for four popular agents, so you most likely won’t have to build anything yourself:
This guide explains the Pi configuration in detail, because every agent’s file is built from the same three pieces — once you’ve seen one, the others look very familiar. If you use one of the other three, you’ll find a section with your exact configuration in Create Your Configuration below. And if you use a different agent entirely, the setup is the same idea — you’ll just point at your own image and command. (We cover that in Custom Docker Images.)
Whatever agent you pick, make sure it’s already set up and can talk to your LLM on its own before
you put it in a sandbox. In practice that means the folder where it keeps your API keys and
settings — for Pi, that’s your ~/.pi directory — exists and works.
Abyss is a single program called abyss. Right now it’s distributed as a downloadable binary from
the
release page.
Darwin_arm64 archive; on an Intel/AMD Linux machine, grab Linux_x86_64.abyss./usr/local/bin/abyss. On Windows, put it in a folder that’s listed in your PATH.On Linux or macOS, steps 2 and 3 usually look like this (adjust the archive name to the one you downloaded):
tar -xzf abyss_Linux_x86_64.tar.gz
sudo mv abyss /usr/local/bin/abyss
In the future, once the feature set settles down, abyss will be packaged for Homebrew, apt, dnf, AUR, and friends so you can skip this manual step. For now, it’s a simple download-and-move.
Confirm the installation by asking abyss for its version:
abyss --versionYou should see a version number and a date. If you get “command not found” instead, your terminal
can’t find the abyss file — double-check the folder you moved it into is on your PATH.
Abyss is driven by one small YAML file. That file describes three things:
Every agent’s file is built from those same three pieces — only the values change. Below there’s a section for each of the ready-made images: Pi, Hermes, Codex, and Claude Agent. Start with the Pi section even if you use a different agent, since it explains how everything fits together. Then copy your own agent’s configuration and meet us at Where to Put the File.
pi-acp (the mode abyss uses) has a few limitations
compared to the full terminal experience. Those are limitations of pi-acp itself rather than
something abyss can work around — worth keeping in mind if a feature you relied on seems missing.Here’s a complete, working configuration for Pi:
docker:
  # A pre-built image with abyss and Pi already installed.
  image: "ghcr.io/sethcurry/abyss-pi:latest"

  # Abyss speaks ACP, so we start Pi in its ACP mode.
  agent_command:
    - pi-acp

  # Folders from your computer that get shared into the container.
  host_mounts:
    # Share the current directory. There's no destination path on
    # purpose: ACP sends your "current working directory", so the path
    # inside the container must match the path on your computer for
    # everything to line up.
    - source: "./"

    # Share your Pi settings so the agent has your API keys, prior
    # sessions, and plugins. Because the container runs as the `root`
    # user, we point it at `/root/.pi` instead of your own home folder.
    - source: "~/.pi"
      destination: "/root/.pi"
Let’s unpack the important bits.
image is the Docker image that provides the environment your agent runs in. We’re using
ghcr.io/sethcurry/abyss-pi:latest, which comes with both abyss and Pi already installed, so
there’s nothing extra to set up. You can find the full list of ready-made images in
Docker Images.
agent_command is the command that starts your agent once the container is up. For Pi, that’s
simply pi-acp.
host_mounts is how you share folders between your computer and the container. This is the
piece that lets your agent read and edit the files you actually care about.
./). Because abyss mounts it at the same
path inside the container, your editor and your agent always agree on where files live — no
confusing path translation to memorize.~/.pi folder, which holds your API keys. We give it an explicit
destination because the container’s root user keeps its settings in /root/.pi, not in
your own home directory.Hermes follows the same recipe as Pi — its own image, own command — with one important difference, so give this section a careful read.
The abyss-hermes image comes with a complete copy of Hermes already installed, and that copy
lives in the container’s /root/.hermes folder. That’s also where Hermes looks for your settings
when it runs. Your computer has its own ~/.hermes folder too: that’s where Hermes keeps your API
keys (in ~/.hermes/.env) and your preferences (in ~/.hermes/config.yaml).
We set this up to bind-mount your ~/.hermes folder into the container, so that any changes you
make to your settings are reflected in the container, and your sessions are
available outside the container as well.
docker:
  # A pre-built image with abyss and Hermes already installed.
  image: "ghcr.io/sethcurry/abyss-hermes:latest"

  # Hermes ships with its own ACP mode.
  agent_command:
    - hermes-acp

  host_mounts:
    # Share the current directory, just like with Pi.
    - source: "./"
- source: ~/.hermesIf OpenAI’s Codex is your agent, good news: its configuration is nearly identical to Pi’s. The image comes with Codex and its ACP adapter already installed, so the only thing you need to bring along is your login:
docker:
  # A pre-built image with abyss, Codex, and codex-acp already installed.
  image: "ghcr.io/sethcurry/abyss-codex:latest"

  # codex-acp is a small adapter that lets Codex speak ACP.
  agent_command:
    - codex-acp

  host_mounts:
    # Share the current directory, just like with Pi.
    - source: "./"

    # Share your Codex login and settings. Codex keeps these in
    # ~/.codex on your computer, and the container's root user looks
    # for them in /root/.codex.
    - source: "~/.codex"
      destination: "/root/.codex"
For this to work, you’ll need to have signed in to Codex on your computer at least once, so that
your ~/.codex folder exists and contains your login.
Anthropic’s Claude Agent follows the exact same recipe as Codex, with its own image, adapter, and settings folder:
docker:
  # A pre-built image with abyss, Claude Agent, and claude-agent-acp
  # already installed.
  image: "ghcr.io/sethcurry/abyss-claude-agent:latest"

  # claude-agent-acp is a small adapter that lets Claude Agent speak ACP.
  agent_command:
    - claude-agent-acp

  host_mounts:
    # Share the current directory, just like with Pi.
    - source: "./"

    # Share your Claude login and settings. Claude keeps these in
    # ~/.claude on your computer, and the container's root user looks
    # for them in /root/.claude.
    - source: "~/.claude"
      destination: "/root/.claude"
Just like with Codex, this assumes you’ve already signed in to Claude on your computer, so your
~/.claude folder exists and holds your credentials.
Abyss containers are ephemeral by default, and re-created each time you run the agent.
To persist data across runs, you can set the docker.persistent_name field in your config to a name, and it will be re-used across runs.
Save the file anywhere you like. A few common spots:
abyss.yaml at the root of your project, if the agent is only ever used there.agents/ directory inside the project, if you keep several agent configs for one repo.Any location works — you’ll tell abyss where the file lives in the next step, so pick whatever feels tidy to you.
Now let’s point your editor at abyss. We’ll use Zed here, but the idea is the same in any ACP client: you register abyss as an “agent server” and give it the path to your config file.
In Zed, open your settings file. The quickest way is to press Ctrl+Shift+P (or Cmd+Shift+P on
macOS) to open the command palette, then type “zed: open settings file” and press Enter.
In that file, paste a section like this:
{
  "agent_servers": {
    "abyss": {
      "type": "custom",
      "command": "abyss",
      "args": [
        "client",
        "-f",
        "/path/to/your/config/file.yaml"
      ]
    }
  }
}
A few notes on this block:
/path/to/your/config/file.yaml with the real path to the file you created in the
previous step."abyss" key is just the name Zed will show for this agent. You can rename it to anything you
like (for example "my-agent") without changing anything else. Just leave the "command" value
as "abyss"."agent_servers" section, merge the "abyss" entry into it
rather than adding a second one.For reference, here’s what a finished Zed config looks like:
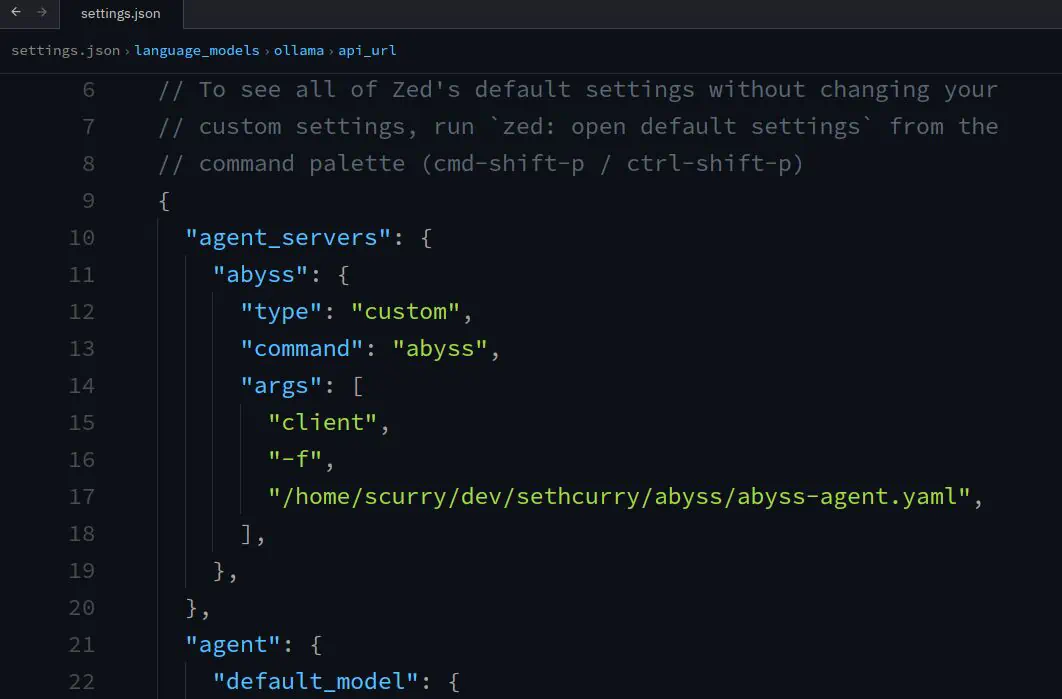
Once you’ve saved your settings, Zed should now list abyss as one of its available agents. Select it and start chatting — abyss will spin up a container in the background, start your agent inside it, and hand the conversation back to Zed.
If you’d like to confirm everything works before involving your editor, abyss has a built-in one-shot mode that runs a single prompt and prints the answer. It’s a great way to sanity-check a new config:
abyss oneshot -f /path/to/your/config/file.yaml "What is the capital of France?"If you get a sensible answer (it’s Paris, in case you’re wondering), your configuration is solid and
you’re ready to go. oneshot also prints its logs directly to the terminal, which makes it the
easiest way to see what’s going wrong if something isn’t working. We lean on it heavily in the
Troubleshooting guide.
Here’s the good news: once abyss is connected, using it is exactly like using your agent before. Abyss is designed to stay out of your way. There are no extra commands to memorize and no special workflow — you just ask your agent to do things, and it works the same as always, except everything now happens inside a sandbox.
A couple of tips as you settle in:
setup_scripts section to your
config so things run automatically before your agent starts.host_mounts for copy_files to
hand the agent a fresh copy instead of a live mount.Both of these are covered in the Configuration reference, which lists every option abyss supports.